Spring MVC 3.1 version has added a very useful feature Flash attribute which it lacked and is now solving a long time problem of POST/Redirect/GET pattern. In a normal Web based MVC application each form submitted POST the data to the server. A normal spring controller (tagged with annotation @Controller) fetches the data from request and process it further (save or update in database). Once the operation is successful, user is forwarded to page showing success of operation. Traditionally if we handle this via POST/Forward/GET, then it may cause sometime multiple form submission issue. User might press F5 and the same data is posted again.
To overcome this problem, POST/Redirect/GET pattern is used in MVC applcations. Once user form is posted successfully, we redirect the request to another success page. This causes browser to perform a new GET request and load the page. Thus is user presses F5, the GET request gets loaded instead of submitting form again.
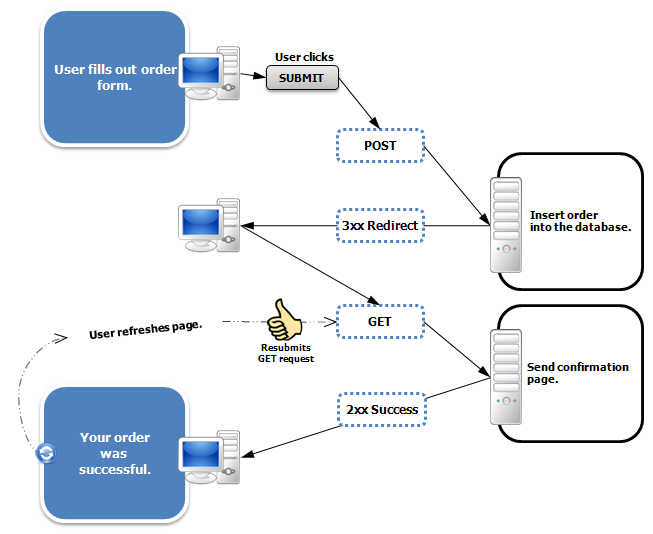
Image credit: Wikipedia
While this approach looks perfect and solve the problem of multiple form submission, it add one more issue of retrieving request parameters and attributes. Normally when we generate an http redirect request, the data stored in request is lost making it impossible for next GET request to access some of the useful information from request. Flash attributes comes handy in such cases. Flash attributes provide a way for one request to store attributes intended for use in another. Flash attributes are saved temporarily (typically in the session) before the redirect to be made available to the request after the redirect and removed immediately.

In order to do this, Flash feature uses two collections. FlashMap is used to hold flash attributes while FlashMapManager is used to store, retrieve, and manage FlashMap instances. For each request an “input” flash map is created which stores flash attribute from any previous request and an “output” flash map is created which stores any subsequent attributes that we store in this request.
Usage
In order to use Flash attribute in your Spring MVC application make sure you using version 3.1 or above. Also add mvc:annotation-driven to spring-servlet.xml file.
<mvc:annotation-driven />Code language: HTML, XML (xml)Once this is done, Flash attribute is automatically set “on” for usage. Just add attribute RedirectAttributes redirectAttributes to your Spring controller’s method.
import org.springframework.web.servlet.mvc.support.RedirectAttributes;
//...

@RequestMapping(value = "addcustomer", method = RequestMethod.POST)
public String addCustomer(@ModelAttribute("customer") Customer customer,
    final RedirectAttributes redirectAttributes) {
    //...
    redirectAttributes.addFlashAttribute("message", "Successfully added..");
    //...

    return "redirect:some_other_request_name";
}Code language: Java (java)
The addFlashAttribute method automatically add the given parameter to the output flash map and pass it to the subsequent requests. Let us see a complete demo application which uses Flash attribute to perform POST/Redirect/GET and passes some information.
Flash Attribute Example
The following application displays a form to user. Once the user inputs data and submits form, the page is redirected to another page where success message is displayed. On this new redirected page, the user input is displayed.
Step 1: Required JAR and Project Structure
If you using Maven as dependency management, use below dependencies to add Spring 3.1 MVC support.
<dependencies>
   <!-- Spring 3.1 MVC  -->
   <dependency>
      <groupId>org.springframework</groupId>
      <artifactId>spring-webmvc</artifactId>
      <version>3.1.2.RELEASE</version>
   </dependency>
   <!-- JSTL for c: tag -->
   <dependency>
      <groupId>jstl</groupId>
      <artifactId>jstl</artifactId>
      <version>1.2</version>
   </dependency>
</dependencies>Code language: HTML, XML (xml)
Alternatively, you can also download following JAR files and place them under /WEB-INF/lib folder.

Step 2: Spring Configuration
Add Spring support to web project by adding DispatcherServlet to web.xml. web.xml
<?xml version="1.0" encoding="UTF-8"?>
<web-app xmlns:xsi="http://www.w3.org/2001/XMLSchema-instance"
	xmlns="http://java.sun.com/xml/ns/javaee"
	xmlns:web="http://java.sun.com/xml/ns/javaee/web-app_2_5.xsd"
	xsi:schemaLocation="http://java.sun.com/xml/ns/javaee
		http://java.sun.com/xml/ns/javaee/web-app_2_5.xsd"
	id="WebApp_ID" version="2.5">

	<display-name>Spring MVC Flash attribute example</display-name>
	<servlet>
		<servlet-name>spring</servlet-name>
		<servlet-class>
			org.springframework.web.servlet.DispatcherServlet
		</servlet-class>
		<load-on-startup>1</load-on-startup>
	</servlet>
	<servlet-mapping>
    	<servlet-name>default</servlet-name>
    	<url-pattern>/index.html</url-pattern>
	</servlet-mapping>
	<servlet-mapping>
		<servlet-name>spring</servlet-name>
		<url-pattern>*.html</url-pattern>
	</servlet-mapping>
</web-app>Code language: HTML, XML (xml)
Also the spring-servlet uses mvc:annotation-driven to enable mvc and also scans the project with context:component-scan tag. spring-servlet.xml
<?xml  version="1.0" encoding="UTF-8"?>
<beans xmlns="http://www.springframework.org/schema/beans"
	xmlns:xsi="http://www.w3.org/2001/XMLSchema-instance"
	xmlns:context="http://www.springframework.org/schema/context"
	xmlns:mvc="http://www.springframework.org/schema/mvc"
	xsi:schemaLocation="http://www.springframework.org/schema/beans http://www.springframework.org/schema/beans/spring-beans.xsd http://www.springframework.org/schema/context  http://www.springframework.org/schema/context/spring-context.xsd http://www.springframework.org/schema/mvc  http://www.springframework.org/schema/mvc/spring-mvc.xsd">


	<bean id="jspViewResolver"
	class="org.springframework.web.servlet.view.InternalResourceViewResolver">
		<property name="viewClass"
			value="org.springframework.web.servlet.view.JstlView" />
		<property name="prefix" value="/WEB-INF/jsp/" />
		<property name="suffix" value=".jsp" />
	 </bean>

	<context:component-scan base-package="net.viralpatel.controller" />
	<mvc:annotation-driven />

</beans>Code language: HTML, XML (xml)
Step 3: Spring Controller – RedirectAttributes
The Controller code uses Customer.java object as bean (command) to holds customer information. Customer.java
package net.viralpatel.spring;

public class Customer {
	private String firstname;
	private String lastname;
	private int age;
	private String email;

	//getter, setter methods
}Code language: Java (java)
The CustomerController class has 3 methods. Method showForm is mapped with /form URL and is used to display Add New Customer form. Th method addCustomer is mapped with URL /addcustomer and is used on POST request. CustomerController.java
package net.viralpatel.controller;

import net.viralpatel.spring.Customer;

import org.springframework.stereotype.Controller;
import org.springframework.web.bind.annotation.ModelAttribute;
import org.springframework.web.bind.annotation.RequestMapping;
import org.springframework.web.bind.annotation.RequestMethod;
import org.springframework.web.servlet.mvc.support.RedirectAttributes;

@Controller
public class CustomerController {


	@RequestMapping(value="showform", method=RequestMethod.GET)
	public String showForm(@ModelAttribute("customer") Customer customer) {
		return "add_customer";
	}

	@RequestMapping(value="addcustomer", method=RequestMethod.POST)
	public String addCustomer(@ModelAttribute("customer") Customer customer,
			final RedirectAttributes redirectAttributes) {

		redirectAttributes.addFlashAttribute("customer", customer);
		redirectAttributes.addFlashAttribute("message","Added successfully.");

		return "redirect:showcustomer.html";
	}


	@RequestMapping(value="showcustomer", method=RequestMethod.GET)
	public String showCustomer(@ModelAttribute("customer") Customer customer) {
		System.out.println("cust:" + customer.getFirstname());
		return "show_customer";
	}
}Code language: Java (java)
Note how we used redirectAttributes parameter on method addCustomer to map flash attributes. Also we used addFlashAttribute method to set new parameters to flash attribute.
Step 4: Views
The add customer JSP displays Add New Customer form. add_customer.jsp
<%@taglib uri="http://www.springframework.org/tags/form" prefix="form"%>
<html>
<body>
	<h1>Add New Customer</h1>
	<form:form action="addcustomer.html" method="post" commandName="customer">
	<table>
		<tr>
			<td><form:label path="firstname">Firstname</form:label></td>
			<td><form:input path="firstname" /> </td>
		</tr>
		<tr>
			<td><form:label path="lastname">Lastname</form:label></td>
			<td><form:input path="lastname" /> </td>
		</tr>
		<tr>
			<td><form:label path="age">Age</form:label></td>
			<td><form:input path="age" /> </td>
		</tr>
		<tr>
			<td><form:label path="email">Email</form:label>
			<td><form:input path="email" /> </td>
		</tr>
		<tr>
			<td colspan="2"><input type="submit" value="Add Customer" />
			</td>
		</tr>
	</table>
	</form:form>
</body>
</html>Code language: HTML, XML (xml)
Show customer JSP simply shows the customer’s first and last name and a success message set as flash attributes. show_customer.jsp
<%@taglib uri="http://www.springframework.org/tags/form" prefix="form"%>
<html>
<body>
<h1>${message}</h1>
	${customer.lastname}, ${customer.firstname} added successfully..
</body>
</html>Code language: HTML, XML (xml)
Demo:
Execute the web project.
URL: http://localhost:8080/SpringMVC_Flash_Attribute_Maven_example/form.html

